A viewer on my YouTube Channel shared this quote with me. I think you’ll enjoy it too.
Fall in love with some activity, and do it! Nobody ever figures out what life is all about, and it doesn’t matter. Explore the world. Nearly everything is really interesting if you go into it deeply enough. Work as hard and as much as you want to on the things you like to do the best. Don’t think about what you want to be, but what you want to do. Keep up some kind of a minimum with other things so that society doesn’t stop you from doing anything at all. – Richard P. Feynman.
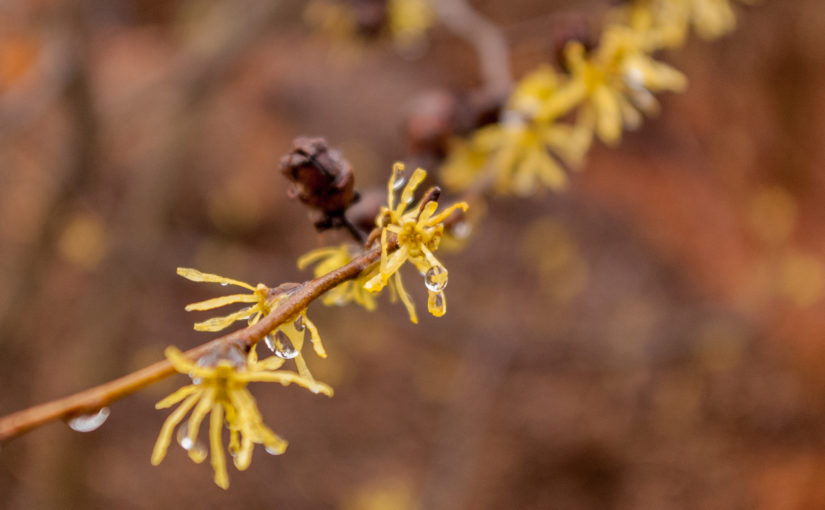
Common Witch Hazel (Hamamelis virginiana) is an underappreciated small tree. It blends into the background most of the year until late Fall when in bloom. How many other trees are in bloom in early December?
A closeup of Common Witch Hazel blooms. I took this picture on a cold and wet December morning with sleet on the ground from the previous night’s storm.
Where to Plant Common Witch Hazel
Don’t use Common Witch Hazel in your foundation planting. It’s informal habit won’t work with modern homes. If you live in a rustic log cabin nestled in the woods I say, “Go for it!”
Plant this large shrub on the edge of the woods where it can blend in most of the year and give late Fall interest.
I planted my Common Witch Hazel at the back of my shrub border. You don’t notice it until late November to early December.
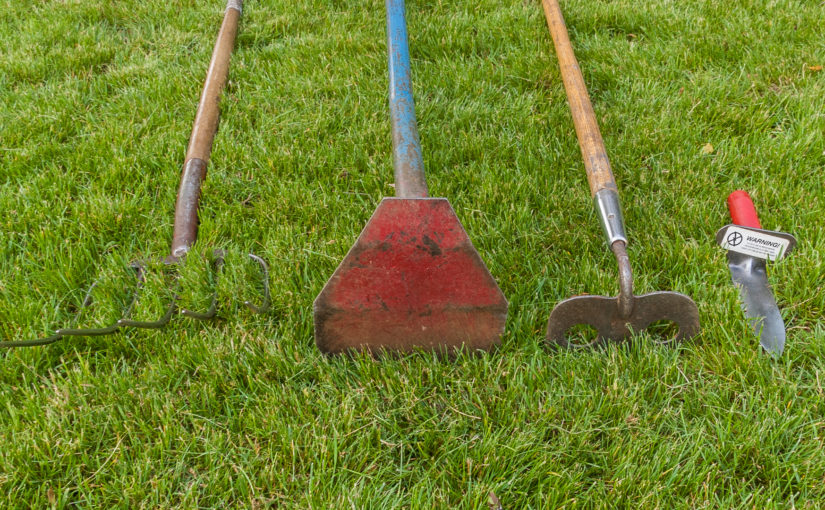
Today I used several weeding tools to maintain a garden overgrown with weeds.
Truth be told it was my fault.
Last fall I overseeded the lawn and some seed found its way into the beds. The gardens were a mix of grass, dandelions and chickweed.
I spent the afternoon ‘hacking’ away at the weeds with my weeding tools. I’d like to share the method to my madness with you.
Weeding Tools Recommendations
First, I went through the beds with my weeding knife (Far right) and pulled the dandelions. If you cut dandelions with a hoe the long tap-root will grow back. You have to dig down and remove the root.
Next, I went through the front of the bed with my grub hoe (Second from left). The grub hoe packs more of a punch than a hoe. It’s perfect for removing heavy weeds and sod.
I used my cutting hoe (Second from right) where the weeds were sparse. A cutting hoe with a sharp edge is the right tool for stray chickweed.
Piles of weeds at the front of the bed ready to pick up with a manure fork.
A manure fork is a perfect tool to load weed piles into a wheelbarrow. A manure fork has sharp tines and lightweight. I recommend you buy a 5 tine manure fork.
I hope you’ll try one of the weeding tools above to improve your productivity when weeding gardens.
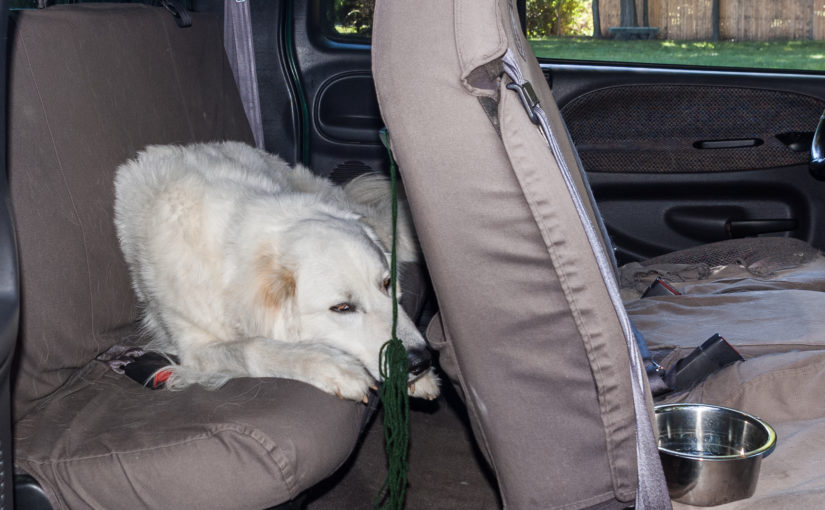
That’s Theo our Great Pyrenees mix enjoying shade in the back of my truck on a hot summer’s day.
I thought Theo was a Great Pyrenees. However, he’s almost two and not ‘fluffing out’ like a Great Pyrenees. I think he’s a Great Pyrenees with some Golden Retriever mixed in.
Theo is an incredibly intelligent, patient and loving 90 lb boy. He wants nothing more than to be where I am.
Last week I dropped the kids off at camp with Theo riding shotgun. When we returned Theo didn’t want to get out of the truck.
He knew I’d be heading out soon enough or perhaps he simply enjoys the cozy spot in the back of the truck. Whatever the reason, Theo wasn’t coming out.
This foundation planting had a couple difficult situations to work with. There’s little space between the house and the sidewalk. In addition, the electric meter glares at guests as they make their way to the door.
I planted Blue Billow Sawtooth Hydrangea between the walk and the house to add color. A standard PG Hydrangea blocks the electric meter and provides additional color in late summer. To the far right, the slow-growing Dwarf Hinoki Cypress will provide color through the long winter.
I’m happy to announce my YouTube Channel, CTScaper has over 400,000 views in the last month. It amazes me that there are that many people who want to hear what I have to say.
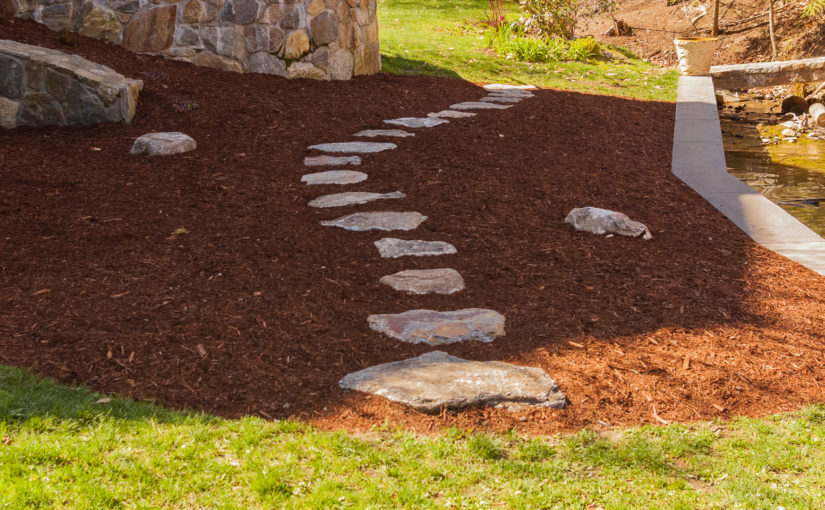
This week I finished installing a stepping stone path.
This stepping stone path is unique for a couple of reasons.
First, it provides a much-needed way to move through the garden. There’s no way to cross the garden without it.
Second, the stepping stone path gently curves to add interest. The path curves left to make room for a future PG Hydrangea on the right.
I’m looking forward to filming the garden when completed.
How to create a Curved Stepping Stone Path
When I started there was no way to get through the bed. The plants were randomly planted with no sense of purpose.The white line is where the stepping stone path will be.It took me a day to select, deliver and roughly place the stepping stones. It took a day and a half to install them. The work usually goes faster. I chose some odd-shaped and large stones. I’m very pleased with the results.Placing the stones is a two-step process. First I roughly place the stones. Next I put an X in the middle with a grease crayon and space them 26.5″ on center. The first and last stone go 13.25″ from the edge of the bed. The beginning and end never work out perfectly. I spread the difference between the last few.Set stepping stones 2-3″ high so they aren’t covered by mulch. Nothing is more annoying than covering your freshly placed stepping stones.I’ve been working on a lake the last couple weeks and enjoying some incredible views. The mulch in this bed is pure Hemlock Bark. My favorite.
A while back I filmed how I install stepping stones. While I’ve gotten better at producing videos the way I lay stepping stones hasn’t changed a bit.
After three days of hard work I’m almost finished preparing a garden bed. It was a hard-fought victory that taught me tips for getting work done.
We’ve had a mild winter and I looked forward to working with the temperature in the 50’s and 60’s. Last week the weather changed. It’s been in the low 40’s with overcast skies and showers.
The first thing I do when I arrive at a job is formulate a plan to get the work done.
First, I removed six yards of mulch from around a Japanese Maple (Acer palmatum sp.) and the landscape fabric underneath. There was too much mulch around the tree.
There was over six inches of mulch under the Japanese Maple (Acer palmatum sp.) along with landscape fabric. The mulch and the landscape fabric had to go for the health of the tree.Removing excess mulch around the Japanese Maple (Acer palmatum sp.).
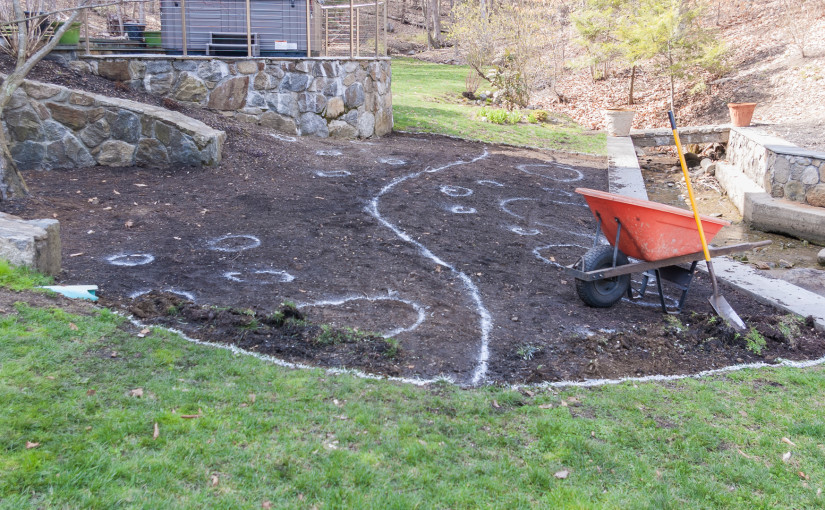
The only place to get rid of the mulch was off the property. That meant loading a wheelbarrow and pushing it up a 15 foot slope to my truck about 40 yards away.
Did I mention this was my first job of the season? My body is nowhere near conditioned yet.
This afternoon as I finished for the day the sun broke through the clouds. It was like the heavens opened up and said, “Attaboy John!”
In a weird twist of fate the sun broke through the clouds as I was finishing for the day. The line through the bed is a future stepping stone path.
Tips for getting work done
Get started. Even if you don’t have a plan for how to do the work. When you start a plan will form in your mind. I’m talking about a plan to complete the work, not a landscape design.
Congratulate yourself for getting started. If you the type of person, like me, who occasionally over thinks things don’t beat yourself up for lost time.
Enjoy the work. I enjoy good “clean” hard work. Digging, mulching, splitting wood, etc. I feel energized, albeit exhausted, after a days work.
Break the job into manageable pieces. I set a goal for each day. My first day on most jobs the goal is to get to the job and get started. Once I’m working a plan will form (See step 1). The second day my goal was to clean up the mulch under the Japanese Maple. The third day my goal was to finish preparing the bed. By the third day I gained momentum and prepared another bed.
Take a break if you need one. Nothing saps productivity like rushing through a job or stressing about a deadline. It may seem counter productive but you’ll notice big dividends from a break.
Wear comfortable shoes. A landscaper is only as good as his or her footwear. If your shoes are heavy you’ll move slowly. If your feet are wet your day will be miserable. Some days I bring a couple pair of shoes and a heavy and light weight sweatshirt. The first two days I wore heavy insulated steel toe boots. When the sun broke I put my lightweight Muck Boots on and felt like I could fly. I wear the lightest shoes I can. The exception is when I need steel toes for safety.
Given the choice I prefer my lighter and more comfortable muck boots.
You started the job. You’re going to finish it. That’s all that matters.
I hope these tips for getting work done will help you get through your next job. Get out there and have fun!