This week I finished installing a stepping stone path.
This stepping stone path is unique for a couple of reasons.
First, it provides a much-needed way to move through the garden. There’s no way to cross the garden without it.
Second, the stepping stone path gently curves to add interest. The path curves left to make room for a future PG Hydrangea on the right.
I’m looking forward to filming the garden when completed.
How to create a Curved Stepping Stone Path
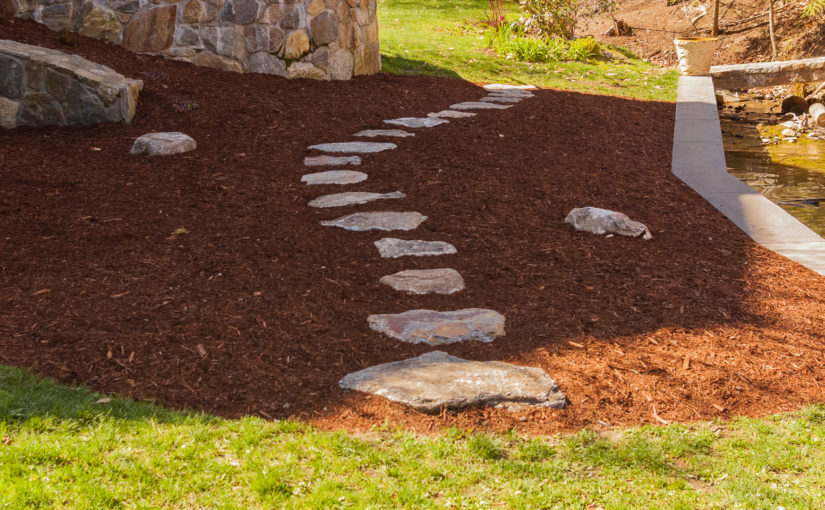
When I started there was no way to get through the bed. The plants were randomly planted with no sense of purpose.The white line is where the stepping stone path will be.It took me a day to select, deliver and roughly place the stepping stones. It took a day and a half to install them. The work usually goes faster. I chose some odd-shaped and large stones. I’m very pleased with the results.Placing the stones is a two-step process. First I roughly place the stones. Next I put an X in the middle with a grease crayon and space them 26.5″ on center. The first and last stone go 13.25″ from the edge of the bed. The beginning and end never work out perfectly. I spread the difference between the last few.Set stepping stones 2-3″ high so they aren’t covered by mulch. Nothing is more annoying than covering your freshly placed stepping stones.I’ve been working on a lake the last couple weeks and enjoying some incredible views. The mulch in this bed is pure Hemlock Bark. My favorite.
A while back I filmed how I install stepping stones. While I’ve gotten better at producing videos the way I lay stepping stones hasn’t changed a bit.
7 responses to “How to Create a Curved Stepping Stone Path”
Mark Whelan
Well planned and exceuted job John.
It looks like the previous planting of the garden bed went on the idea of
X number of plants into Y area of space means a seperation of Z ft (or meters depending on where you live).
This second method looks great, straight after planting. but will inevatibly lead to problems as the plants grow
The previous planting is a buffer zone on the edge of the lake. It’s serves a purpose but doesn’t do much for aesthetics. My job was to keep the buffer zone concept using pretty plants. Hopefully there will be a video of the final product later this season.
Loading…
Asheville Landscaping
Stone Path are very popular to make your home most attractive. Landscape design make any home very beautiful.
Thanks for these instructions for placing the stones for my stepping stone path. Spacing them out so that they’re 26.5″ on the center and 13.25″ from the edge of the bed seems like good guidelines for keeping them spaced out well enough. I was pretty nervous about being able to determine the perfect places to put them, so your tip for crossing an X in the middle with a grease canyon will make the process easier for me.
I like that you talked about how you should put the stepping stones 2-3” high so the mulch doesn’t cover them. It would be really annoying and tiresome to dig the stones out to the mulch. It does seem like a good idea to have a professional do the landscaping for you.
I want to make my garden more unique. It makes sense that a stepping stone path would be a good way to accomplish that! I’ll make sure that I set up a line so I know where to place the stones in a nice gentle curve pattern.


Comments
7 responses to “How to Create a Curved Stepping Stone Path”
Well planned and exceuted job John.
It looks like the previous planting of the garden bed went on the idea of
X number of plants into Y area of space means a seperation of Z ft (or meters depending on where you live).
This second method looks great, straight after planting. but will inevatibly lead to problems as the plants grow
The previous planting is a buffer zone on the edge of the lake. It’s serves a purpose but doesn’t do much for aesthetics. My job was to keep the buffer zone concept using pretty plants. Hopefully there will be a video of the final product later this season.
Stone Path are very popular to make your home most attractive. Landscape design make any home very beautiful.
Stepping stone paths encourage people to enter, not just look at, gardens.
Thanks for these instructions for placing the stones for my stepping stone path. Spacing them out so that they’re 26.5″ on the center and 13.25″ from the edge of the bed seems like good guidelines for keeping them spaced out well enough. I was pretty nervous about being able to determine the perfect places to put them, so your tip for crossing an X in the middle with a grease canyon will make the process easier for me.
I like that you talked about how you should put the stepping stones 2-3” high so the mulch doesn’t cover them. It would be really annoying and tiresome to dig the stones out to the mulch. It does seem like a good idea to have a professional do the landscaping for you.
I want to make my garden more unique. It makes sense that a stepping stone path would be a good way to accomplish that! I’ll make sure that I set up a line so I know where to place the stones in a nice gentle curve pattern.